Feeds:
Posts
Comments

Come one, come all!

A lot of you have not yet come over to follow my blog on it’s new home. It’s easy even if you don’t have a Blogger or BlogSpot account… updates can be sent to your email!

What have you missed?

  • Coconut curry chicken!
  • Scrap material bracelets
  • Revisited trends
  • PB&J heart cookies
  • Breakfast smorgasbord biscuits
  • Baby blanket & diaper cake tutorial

There are some great things in store for March (teaser: fun new crafts, delicious recipes and a highlight in Real Simple!) and you wouldn’t want to miss out on those! Take a look: http://spoolandspoon.blogspot.com/

Come one, come all. The new blog is in full swing.

Today? Smorgasbord Breakfast Biscuits — Filling and delicious. YUM!

We’ve Moved!

After toying with the idea for the past couple of weeks, I’ve decided to switch over to Blog Spot. Please be a doll and subscribe to the new blog so you don’t miss out on the great things to come!

Please take the opportunity to visit the new site: http://spoolandspoon.blogspot.com

Todays post: Diaper Cake Tips

I have wanted a great wreath on our door since taking down all of the holiday stuff. After searching high and low and everywhere in between, I wasn’t able to find one that oozed charm and simplicity so I settled on decided to make my own.

I knew what I didn’t want it to look like, but I couldn’t picture what I DID want. For inspiration, I turned to Pinterest (where else?!) and found so many adorable coffee filter wreathes. Oh the things you can do with common household supplies… I love it!! While I thought a full frilly wreath might be too much for the Mr. to handle, when I saw this, I knew I was on to something.

Off to AC Moore I went for a grapevine wreath and house numbers.
$7.87, some paint and a bit of hot glue later I had this:
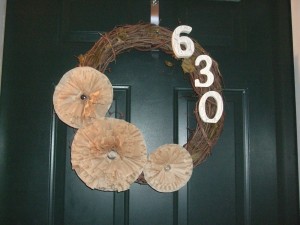
With minimal supplies and just an hour of time the wreath was done.  Not too shabby… rather, it’s just shabby enough!!

Since the numbers are what took the most time because of the crackle finish, I thought I would actually highlight that aspect rather than the flowers since there are tutorials all over the web for those. I wanted something that looked found but I didn’t have time to browse antique stores for a 6, 3, and 0. Crackle is all over everything – outdoor décor, picture frames, even finger nails, so it was easy to decide upon that finish. I ran across some crackle medium at the craft store for $8 which on its own was not that bad but since all I wanted to paint was three 4” letters, that just didn’t seem cost effective.  I did some searching and found that you can do crackle with Elmer’s glue… SAY WHAT?! Yes, you read that right. Elmer’s glue will create a phenomenal crackle finish!

Materials needed:

  • Elmer’s glue (wood glue, all purpose, school… any will work)
  • Acrylic paint
  • Water (if desired)
  • Sponge brush.

Steps:

  1. Sand/prime object if necessary
  2. Paint the object with a thin base coat of paint; this is the color that you want to see through the crackles. Let dry completely. (about 10 minutes, give or take)
  3. Paint a thick, gloppy (gloppy is a word J) coat of glue. Allow it to get tacky and thicken up a bit but do NOT let it dry.
  4. Immediately paint the main color; this is the color that will eventually crackle. Try to paint in one direction, which I personally found to be a bit difficult considering I was making a 3-dimensional object, but do your best!
  5. Step back and let it dry. This will take a good 10-30 minutes to completely dry on its own. You’ll gradually see the crackles begin to form which is fun in its own right. (I lack patience entirely, so I pulled out my blow dryer and put it on a low setting to speed up the process)
  6. Enjoy the crackly goodness and use for whatever finished project you want! Since Elmer’s is not waterproof, you NEED to waterproof it with a clear coat, but that’s not necessary if it won’t come in contact with water.

I’m in Stitches!

If it’s even possible, my sickness has spread to my ear… Guess I will try to make an another appointment on Monday to start getting back to normal. Now, on to better and happier things.

I mentioned in this post that I wanted to learn embroidery and I have already taken some steps and learned a few stitches! It’s definitely one of the crafts that are easy to learn — just hard to master (at least for me). Even after my very limited exposure, I LOVE EMBROIDERY!! I think the best way I can come up with to describe  it is doodling with thread.  Like drawing and coloring, it’s really a limitless medium. I’m hooked and so happy I decided to learn. If you’re looking for a new crafty hobby, I suggest you try it because it’s relatively inexpensive ($2/hoop, $3/fabric, $.35/embroidery floss, and $2/embroidery needles) so if it doesn’t reel you in, you won’t be out much cash in the long wrong. Once you have everything you need, you’ll have to learn how to do it.

 There are great resources out there to learn the stitches and to gather creative inspiration. Sarah’s Hand Embroidery has been my stitch bible because the tutorials are so easy to use and there are examples for each and every stitch that you can imagine. I also used YouTube and found some great videos that demonstrated how to split the thread which was something I didn’t even know I was supposed to do. Now that I know the basics (and you can, too!), it’s time to get some ideas on what to do with that knowledge.  Two books that I want to check out are Sublime Stitching and Doodle Stitching. Pinterest is also great because you can see what other people are doing and also gather free patterns.

My First 4 Stitches

I was considering doing a tutorial, but I’m not good enough yet so I suggest you check out Sarah’s directions because they are fool-proof.

1. Satin Stitch – http://www.embroidery.rocksea.org/stitch/satin-stitch/satin-stitch/
2. Back Stitch – http://www.embroidery.rocksea.org/stitch/back-stitch/back-stitch/
3. French Knot – http://www.embroidery.rocksea.org/stitch/knots/french-knot/
4. Chain Stitch – http://www.embroidery.rocksea.org/stitch/chain-stitch/chain-stitch/

Here’s to hoping that you like embroidery just as much as I do!

You can now call me Germy McSickerson. Strep Throat and Bronchitis are dominating my life right now. Besides work (somehow I haven’t missed a day!), my free-time has consisted solely of laying in bed and snuggling with my kitty on the couch. It’s been so bad that the Mr. had to learn how to do the laundry.. That didn’t even sound like I was upset did it? haha. Surprisingly, I have done a few projects with some of the extra time from the long weekend. I’m a baby, though –a hideously flush, runny-nosed, red-eyed baby–  and haven’t updated my blog so I thought I better keep myself on track. 

Just so you know what to look forward to in the next week or so:

  • Coffee Filter Flowers / Wreath
  • How to Hem Curtains
  • Kate Spade Cardigan Knock-off
  • First Attempt at Embroidery
  • Spaghetti with Sausage, Peppers & Onion Tomato Sauce
  • ((I might even throw in a post about the Great Bridal Expo if I see anything inspiring/creative on Saturday — I’m the MOH!))

New and Improved!

Happy 2012!  It’s that time of year again… time for the kiddies to go back to school, for you to get back to work, and for me to make my list of resolutions.  I know there are a lot of people out there that don’t make a New Year’s Resolution but the endless possibilities of a whole new year are too enticing for me to resist.

Unlike most people I tend to be very good at sticking with my resolutions. My secret? I follow three rules I learned in my 7th grade social studies class. (Thanks, Mr. Z!)

  • Be specific.
  • Be realistic. 
  • Be passionate.

2012 Resolutions:

  1. I resolve to do something new: learn to embroider, do a Pin a week (and blog about it), and take a weekly Pilates class.
  2. I resolve to be a healthier person: spend 30+ minutes on the treadmill during each gym visit, wear sunscreen daily, and purchase/eat organic meat, vegetables, fruit, and dairy.
  3. I resolve to take more pride in my appearance: wear lipstick regularly, dress like the icons I admire, and wear my contacts more often.

Nuts About Nuts

I’m probably biased, but I have the best candied nut recipe ever. I made them as gifts over Christmas and have received rave reviews, so maybe I’m not too far off in my belief. We’re going to a NYE party this weekend and I have decided to make a huge batch to bring along.  After tasting these, your friends and family will be eating out of your hands (if you let them, that is).

Sugar & Spice [and everything nice] Nuts

Ingredients:

  • ¼ cup of dark brown sugar
  • 2/3 cup of white sugar
  • ¼ teaspoon of cayenne pepper (add more or less to suit to your tastes)
  • 1 teaspoon ground cinnamon
  • 1 teaspoon salt
  • 1 to 1 1/4  pound of pecan halves (or mixed nuts)
  • 2 egg whites

Directions:

  1. Preheat oven to 300 degrees & line a large cookie sheet with parchment paper
  2. Combine sugars, cayenne pepper, cinnamon & salt in a mixing bowl. Blend together with a fork.
  3. Beat egg whites until frothy but stop before it is forming peaks
  4. On a low speed, combine egg whites and sugar mixture until relatively smooth
  5. Fold in the nuts and toss until evenly coated
  6. Spread the sugar & nut mixture onto the parchment-covered cookie sheet
  7. Bake for 30 minutes; pull out once every 10-15 minutes to stir
  8. Remove from oven and separate the nuts as they cool
  9. Once they are cool, they are ready to eat/store/gift.

This slideshow requires JavaScript.

Mmm mmm! Delicious!

Wedding Day Shadow Box

I love being married. No really, I do! There are very few days that compare to your wedding day and mine was an absolute dream! It’s the first day of the rest of your life but on a sad note, it’s just that… 24 hours and then it’s over. I miss it every once in a while and that’s when I find myself browsing through the online portfolio of wedding photos.

Since I’m such a sentimental person I’ve been toying with the idea of a shadow box. I have pictures all over, but I wanted to showcase not just photos, but mementos, too. Since I had some time to spare today, I was able to get this project completed. I bought a shadow box frame around Thanksgiving and just needed to figure out what I wanted to put inside. Since mine was for the wedding, it was rather easy because there was only a day’s worth of items to select, but for something like a baby’s first year, or a vacation, I could imagine that being much more daunting.

Materials Needed:

  • Shadow box frame (mine had a fabric-covered foam backing and a hinged door)
  • Straight pins
  • Double-sided tape
  • Pictures and small trinkets (try to make sure that each item has direct relevance to whatever topic/event you choose)

For my project, I used:

  • Fabric (scrap from the clutches I made for the bridesmaids)
  • Groom’s boutonniere
  • Dried Moss, twig, and flower from a centerpiece
  • Remnant from my veil — I cut a piece off a piece of the scalloped edge . (I swear I’m not crazy, but I also don’t live under any ill-conceived notion that my future daughter will think my fashion selection is as timeless as I do.)
  • Portrait of us
  • Save the Date announcement
  • Wedding Invitation

Directions:

  1. Gather any items you may want to place in your shadow box. You may notice that once you have them all together, you will want to create a color scheme or maybe something is just a bit too large. For example, I had originally wanted two pictures, but one was black and white which conflicted with the natural hues of everything else so it was an easy decision not to include it.
  2. If covering the backdrop, cut the fabric to the exact size of the opening (if not, go to step 3). While the back of my shadow box wasn’t ugly, it was a bit too white plain. I placed the double-sided tape all over in order to create a sticky surface to easily adhere the fabric from my bridesmaids’ clutches.

    it's faint, but you can see the tape criss-crossing all over

  3. Arrange all the items in a visually appealing way. Consider size, depth and texture in your layout. Larger items should be placed in the background, while smaller items that might get lost should be placed in the foreground. If using all flat items (say photos, postcards, and ticket stubs), consider attaching layers of foam board to the back so that you get some dimension rather than just a collage.

    trial and error!

  4. Once you have a layout you are happy with TAKE A PICTURE
  5. Remove all of the items.
  6. Following your photo as a guide, begin attaching the items. For flat things I used double-sided tape, but for items that need more stability, use a pin to attach them. If using a pin, do not use it like a thumb tack!! Go in on a very tight angle, as close to horizontally as possible.
  7. Once you’re finished, step back and stare in awe at your masterpiece!

Hmm… now where do I put it??

its temporary home in my office


supercalifragiLIPSTICK

I normally wouldn’t obsess over a beauty product, but I need to declare some love for Maybelline’s Super Stay24 hour lip color! It is uh-maze-ING! I was walking around Target last week (I know I’m not the only one who peruses the aisles on my lunch hour) and I was trying to pick out a red lipstick. I was originally planning on grabbing one of the regular kinds but at only $8.29, trying out an all day color seemed like a smart alternative. I have tried the 24-hour glosses and I’m not impressed. I can’t stand the sticky goopy feeling, but this is balmy like chapstick. It’s a simple 2 step process, and while it takes 2 minutes rather than the 10-second swoop, it’s definitely worth it in the long run.

Step 1: Apply the color base. The one I bought is called All Day Cherry. I apply it rather thinly and in 2 layers. Let it dry completely – about a minute or two.

Step 2: Apply the clear top coat. (FYI, you will have to apply this coat intermittently throughout the day)

Voila! It’s shiny and beautiful but my husband won’t have to fear smudges all over him 🙂

don't mind the weird angle...